How to Install Linux on Windows
Dual boot any Linux distro alongside Windows
Windows is the most popular desktop OS on the planet, with an approximate share of 87.6% far beyond Linux at a measly.
However, this completely reverses when you begin looking at other OS distributions. Unix (the majority of which are predicted to be Linux) is dominant in the realm of public internet servers, hosting over twice as many servers as Windows.

Last but certainly not least is the absolute dominance of Linux in the field of supercomputers. Linux has a clear monopoly, with 100% of the top 500 supercomputers globally as of June 2020 [3].
> Prerequisites
1. USB Drive
2. Etcher Software
3. Linux Distro
> Create the Bootable Drive
> Boot From Your USB> Install Ubuntu
> Dual Boot
Prerequisites
- USB drive — First you need a USB drive. Everything on the drive will be erased so you can use it as a bootable drive (required for installing Linux). Try and use something disposable. As I’ve noted, several people have had problems with their USBs after using the Etcher software.
- Etcher software — You need software to install your chosen Linux distro. I will be using Etcher, which is very good and helps us avoid overwriting anything that we don’t want to be overwritten.
- Linux Distro — Finally, you need a Linux distribution to install. This requires an ISO image of the distro. You can find several popular ones here: Ubuntu, Debian, CentOS.
Once you have all three, you’re ready to go!
Create the Bootable Drive
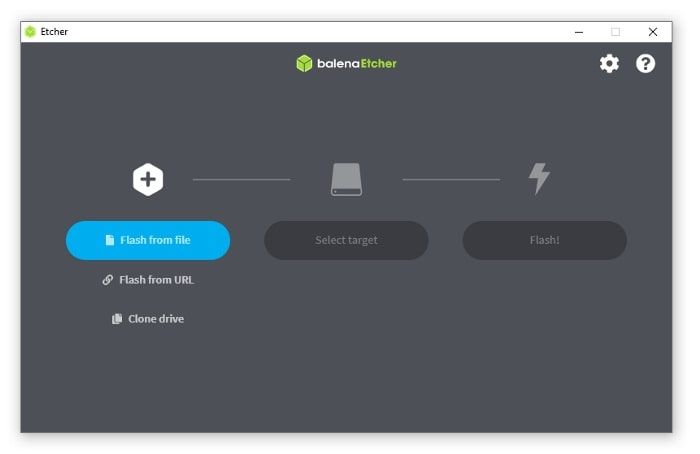
After downloading Etcher, you should see the Etcher window. (If not, open it manually.) Here we select our download ISO file, select our target (a USB or a CD/DVD), and click Flash! Flashing process of Ubuntu onto an external USB stick.

After this, we need to wait for Etcher to flash the ISO file onto our drive, which shouldn’t take long. Once complete, we move onto the next step.
Boot From Your USB
Next, we need to head into our BIOS to change the boot order of our computer.
You can get into the BIOS menu by restarting your computer and pressing the BIOS entry key on startup. This changes for each system, but is typically something like F1, F2, F10, or DEL:
Common brands and their BIOS keys sourced in-part from HP
Once in the BIOS menu, navigate to Boot and set the USB drive with Linux as the first boot option.
After making this change, save the BIOS changes and let the computer boot. We should see the Linux distro installer appear. (If not, try restarting the computer or disabling fast booting in BIOS). This takes us to our next step.
Install Ubuntu
Bear in mind that these steps can be completely different depending on the distro you are installing. For example, Debian is not as straightforward as Ubuntu. So if you are installing another distro, be very careful and find another article dedicated to installing that distribution.

The first screen should show you two options: Try Ubuntu and Install Ubuntu. It is recommended you try it first, testing that your hardware integrates with Ubuntu as expected.
Once you’ve finished testing, go back to your home screen and click Install Ubuntu 20.04 LTS (or whichever version you are installing).
This will take you through the installation process, including a few important steps (alongside many minor tweaks such as setting the keyboard layout, current location, etc.).
Those important settings include the following:
Updates and other software
- Minimal/normal installation: Here I go with minimal to reduce software bloat from media players, etc. However, this is not necessary — go with what you prefer.
- Whether to download updates while installing Ubuntu: This can help us reduce the time spent manually installing updates later, which can be useful.
- Whether to install third-party software for graphics and other items: I would recommend this to help Ubuntu better integrate with our hardware without manually installing/updating drivers.
Installation type

The “Install Ubuntu alongside Windows 10” option must be shown — this is how we install Ubuntu without wiping Windows
It is very important that you can see the “Install Ubuntu alongside Windows 10” option — and that you choose this.
Do not choose “Erase disk and install Ubuntu” if you already have an OS you would like to keep because everything will be wiped with this option.
If you cannot see the “Install Ubuntu alongside Windows 10” option, you most likely need to change where you are booting from. Two options should be available: booting from UEFI or from BIOS (which can be changed from the BIOS menu).
There are several suggestions on Ask Ubuntu for fixing the problem of Ubuntu installer not detecting Windows.
Install Ubuntu alongside Windows 10
The final important step is to decide how much space to allocate to Ubuntu and Windows. The left box represents Windows and should say Files, whereas the right box represents Ubuntu and should say Ubuntu accordingly.
Install
After a few more simple steps, you should be given the option to “restart now”. Do this to begin the final part of your dual boot setup.
Dual Boot
On the restart, head back into your BIOS menu. Confirm that fast boot is disabled and the boot order prioritizes Ubuntu first (this should have been updated automatically after installing Ubuntu). Save and exit.

The computer should continue loading as usual, but you should see the above appear before reaching the Windows loading screen. There may be more or fewer options — just as long as you have Ubuntu and Windows 10, everything should be set up!
We will now always be presented with this screen during computer startup, which will allow us to choose between Ubuntu or Windows. The default Ubuntu home screen

You may find that you need to install graphic drivers or other things before Ubuntu integrates flawlessly with your hardware, but all of the essentials should now be up and running. You should find the Ubuntu home screen after selecting Ubuntu in the dual boot menu.
There are many reasons that we may want or need to work with both Windows and Linux. No matter what the reason, dual boot is often the perfect solution.
An alternative that should be considered is Windows Subsystem Linux (WSL). It abstracts much of the effort of all we have covered above, but at the same time, doesn’t provide full-fledged Linux GUI or GPU support.
Nonetheless, if a more terminal-oriented experience is all you need, there is a great article covering WSL by Dimitris Poulopoulos.
That is all for this article on dual-booting Windows and Linux. I hope you found it useful.
If you have any questions, let me know via Twitter, or in the comments below. If you would like more content like this, I post it on YouTube too.
Thanks for reading!